| In June, 2011 I got a question about the size of the plastic wind
wings of my 1973 Glassic
#689. Unlike the Replicar below, this one has old plastic wind wings on
it, with holes in the plastic to hold the mounting screws. The
measurements on these is" 8 1/2 inches wide by 13 1/2 inches tall. The space between the upper and lower mounting holes is 6 inches. PLASTIC WIND WINGS ARE NOT OFFERED IN THE BRATTON'S CATALOG MENTIONED
BELOW. I suspect, but cannot say for sure, that the glass windwings and the clamp-on style mounting hardware would bolt right on in place of the existing brackets. *******************
My 1978 Replicar (the Annexmaster's car 1254) did not have windwings when I got it. It does now! -- I used Bratton's Antique Auto Parts catalog (see LINKS ) and bought the following items: 2004
catalog, page 116 -- 1930-31 Deluxe open 13" tall windwings - plain
$29.70 pr or floral leaf design $46.20 a pair. I also got the "windwing clamps (pg 115) for 1930 -31 open cars $62.50 per set. (I picked them up, so I can't say about postage and tax. The stuff IS heavy.) Other clamps may also fit, but these do for sure (on my 1978, at least) Dave, car 1279, helped me install these and shared some tips. His windwing fell off after installation - once while driving down the road. It did not break, however, even though it got run over by traffic! 1) Don't try to install them by yourself. The job needs at least 4 hands. 2) Use the lock washer as shown in the instructions below. The arms pinch the glass by a fulcrum kind of process, and the lock washer makes that bolt not "bottom out". Dave thinks the bolt should have been a bit shorter to start with. 3) The tiny thumb wheel can be screwed all the way in to start with. If you aren't happy with the holding power (tug on the glass) you can loosen the bolt with the lock washer, loosen the thumb screw a quarter turn or so, and re-tighten the lock washer bolt. -- doing that makes the arms pinch at a greater angle -- you don't want to over do it, however or the arms will only be pinching at the end. On my car we only adjusted the bottom one on each side. 4) Keep a screwdriver handy and check often for a while. A few hours in the summer sun will soften the gripper tape and you should re-tighten the bolts. Watch for ANY sign that the glass is not all of the way into the gripper - if you see it moving out at all - pull over and retighten right then. |
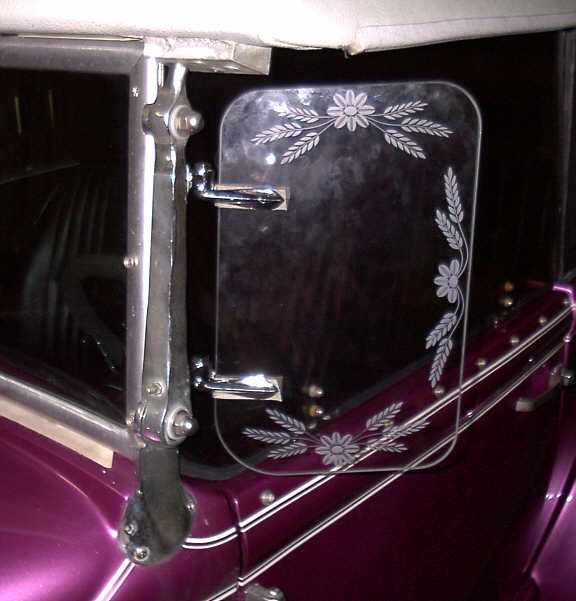 The etched pattern could have been put face in, or face out. I put them face in, so that the "bug catching" front would be smooth. The tape that forms a U shape between the pinchers and the glass came with the hinge set, and still needs to be trimmed with an exacto knife. The finger smudges need to be cleaned up and the chrome waxed too. |
|
Close-up. The hardware screwed right into the holes in the back of the windshield stanchions. No drilling was needed -- The instructions below must be for a real Model A, where the holes were not there. |
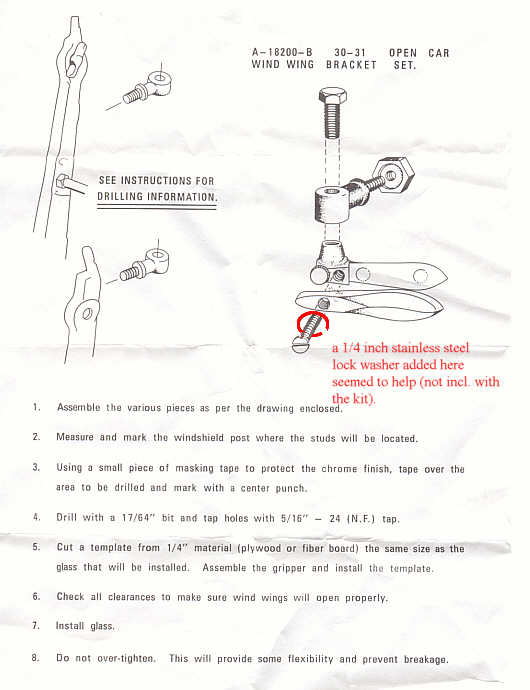 These instructions came with the tiny, heavy, expensive box of hardware for the windwings. The red is done by me. |
