GlassicAnnex

Automatic Overdrive Transmission (AOD) swap

In the first half of 2019, the owner of Roadster # 897, Ron,  upgraded his C4 transmission (that was original to the car) for a overdrive transmission.  Here are his notes and pictures.

An important thought from Ron, the contributor of this info.

 I don't want to mislead that it was a simple task.
 I just want to help the next one without trial and error that I had to endure.

As of May, 2019, Ron can be reached at Ronmoore007@yahoo.com 

CLICK ON ANY PICTURE ON THIS PAGE TO ENLARGE IT -

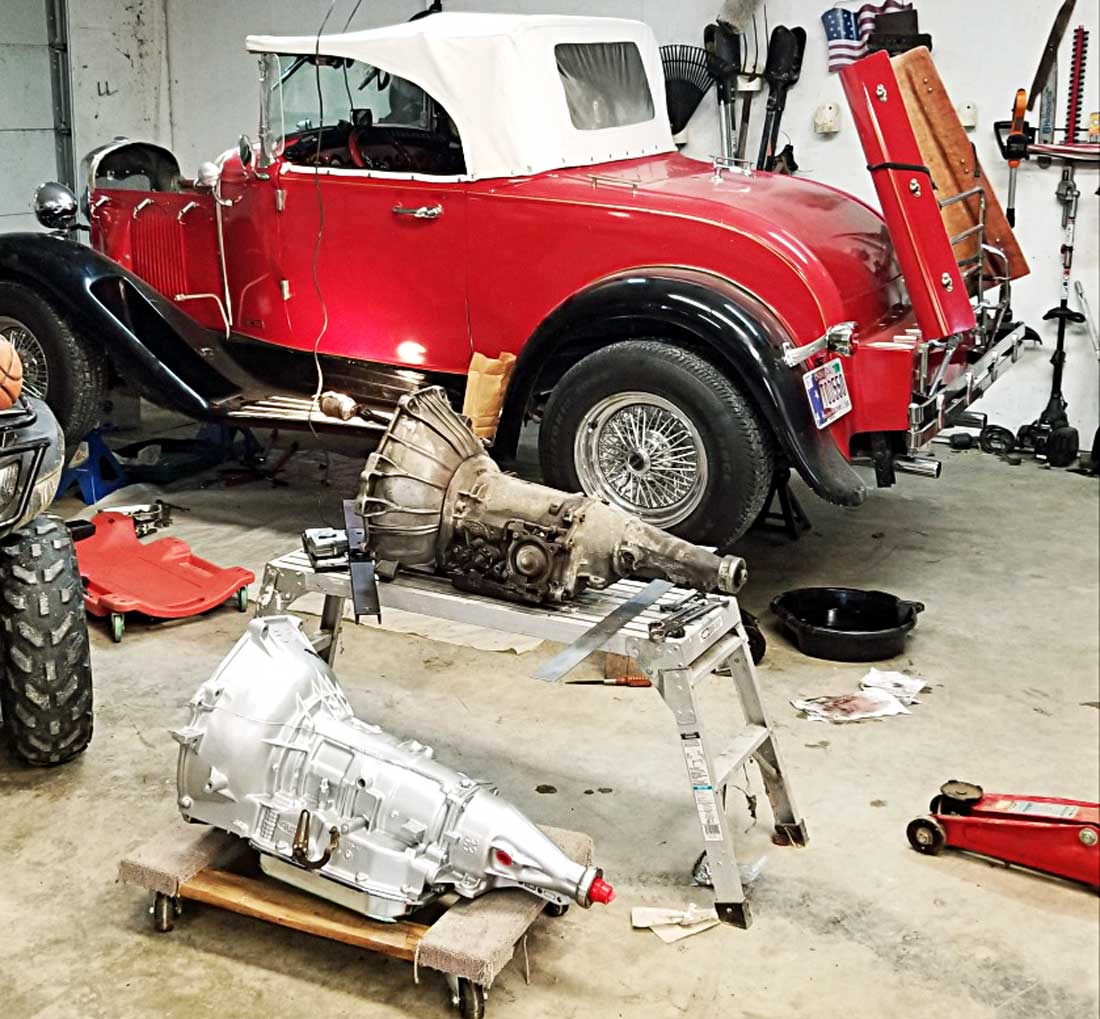
Roadster 897 from Westport Indiana. Over the winter of 2018-2019 I swapped out my factory C-4 to a AOD and wanted to share the results and how it is running.

I ordered it from Monster Transmission and it took them 5 weeks to build it for a cost of $2,000.

CLICK FOR LARGER VIEW


MCP-AODAS5-05K
Ford AOD HD Transmission Master Conversion Package 2WD
Torque Converter: 1600-1800 Stall
Shift Firmness: Level 2, Firm positive shifts
Case Color (Aluminum/Gray (Standard)
Pan Style: chrome pan with drain plug.
TV Cable Items included with this kit: Premium Braided Throttle Valve Cable
Carburetor specific TV Cable options: Edelbrock Carburetor Throttle Valve Corrector - $43.00
Included Accessories: Fillertube & Dipstick, Engine Block Plate, Coolant Line Fittings, Converter Nuts, Trans Mount, Speedo Gear, Neutral Safety Switch, Cooler
Fluids/Oils: 12 Qts. of Burn Rubber Brewery Premium Synthetic Trans Fluid (Your Trans will be thirsty. It will need all 12!) $149.95
Linkage: Included for testing purposes.


I wanted a known good running transmission with guarantee.

It took me three days to do the swap. Another couple of weekends to finish the details.

 The AOD is much larger so it needed some help to make it fit. See my picture of the two.

CLICK FOR LARGER VIEW

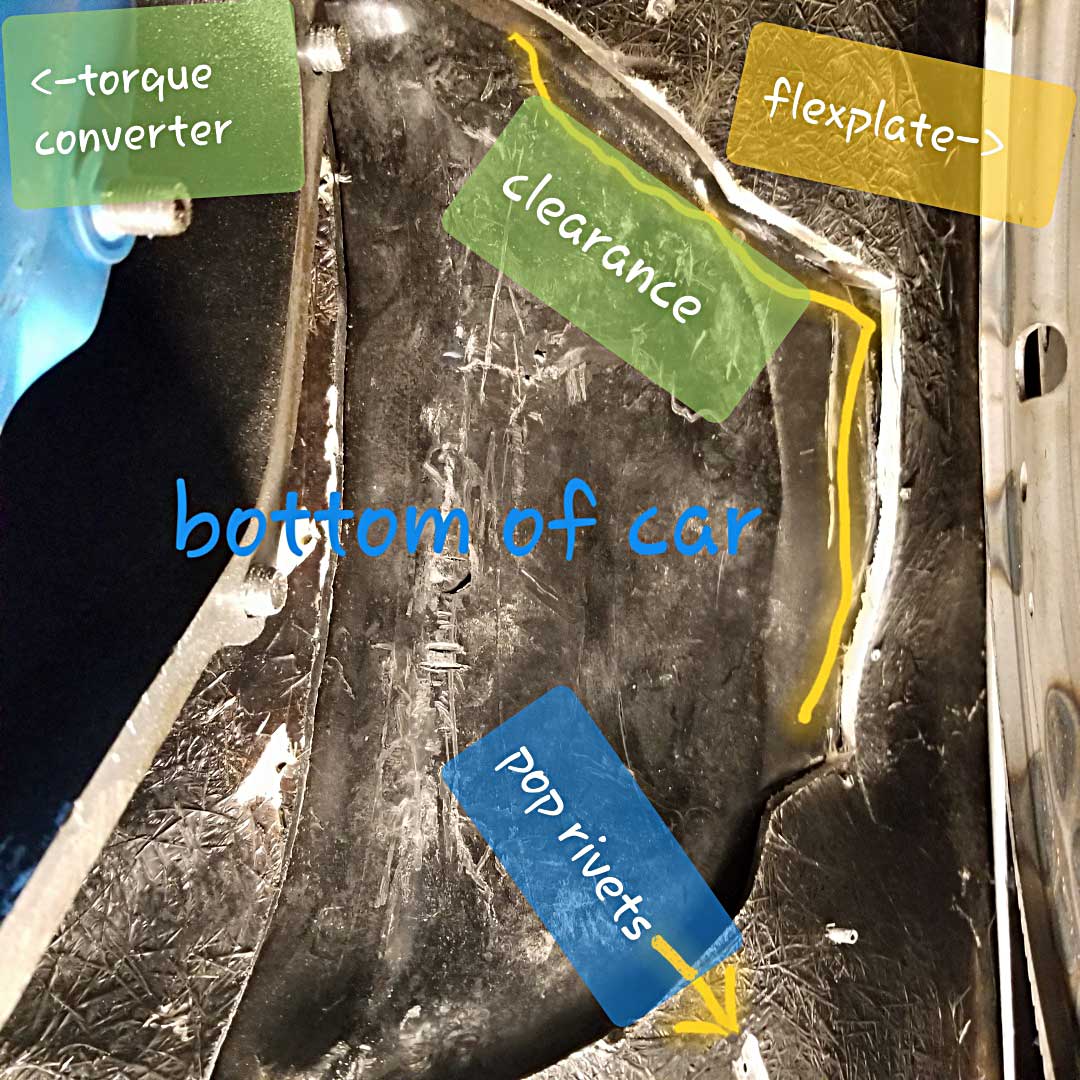
Fitting the new transmission

 I needed to drill out most of the pop rivets on the transmission tunnel so I could get the bolts started. I left in a few of the rivets and it hinged on the front. Ron might also have removed ALL the rivets and merely lifted the part out of the car. By leaving it connected, he saved time aligning the part to re-close the hump. When it was done I just went the next size up rivet and fastened it back in. Left side of the picture below is the 1800 rpm stall converter and on the right is the flexplate
As you can see I needed a bit of clearing to slide the transmission into the engine. I used a cut off wheel. Get your ventilation ready for the glass dust will fly.
I also cut the top two bolts back to 2 1/4 length. I chased them with a 5/16 die to verify good threads.


CLICK FOR LARGER VIEW     CLICK TO ENLARGE THE VIEW
view from under the car, looking upward into the now empty transmission tunnel.               Mounting tab and slope angle of the transmissions differ.                                                 

The old c-4 had plenty of room but the new AOD is tight.  The new one mounting bolts are 2 1/4" long.   To raise the new one high enough so the pilot in the converter and crankshaft can mate and slide it needed more room.  Once it is slid back on the crankshaft and the four converter to flexplate bolts are aligned (converter has a drain plug that needs to be in one of the two flexplate clearance holes) the issue goes away.  The old c-4 tapers off quick but the AOD has a larger housing.   I chose to put the mounting bolts in before mating the trans to the motor.  I did not want to figure out how to put the top two bolts afterwards.  


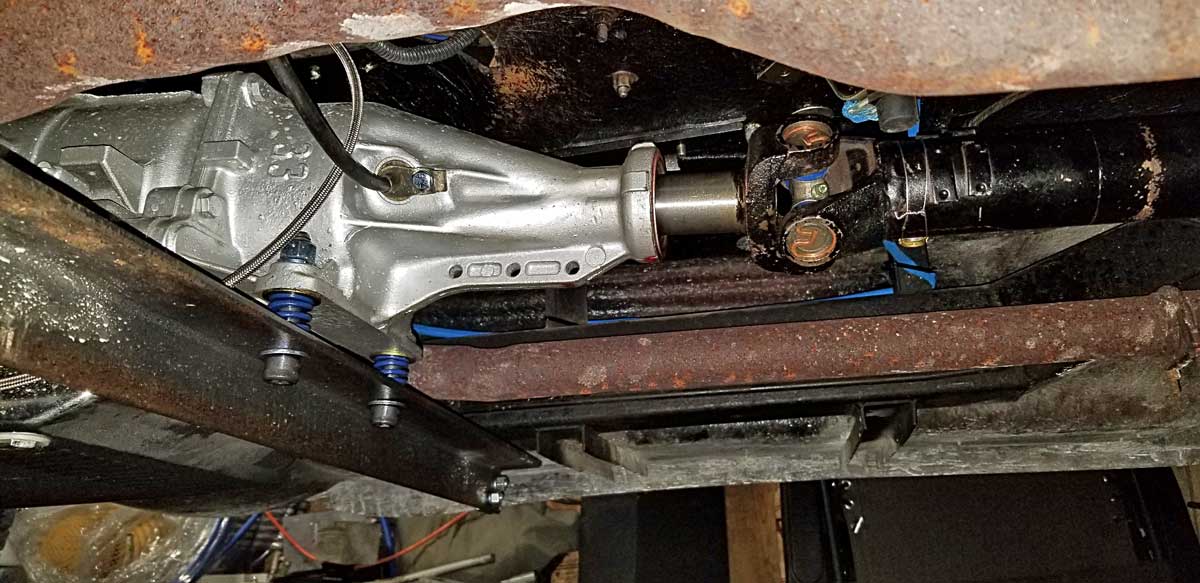
I purchased  two  Spicer 5-153X U-Joint Kits https://www.amazon.com/dp/B000CKN762/ref=cm_sw_r_cp_apap_JJDyBmf5ffld3

(My 45 year old sealed U-joints had rust and soon would fail. These new ones have a zurk grease  fitting).

 CLICK FOR LARGER VIEW      CLICK FOR LARGER IMAGE

I cut one inch off the yoke of the old c-4 and this compensated for the AOD being one inch longer. Just a hacksaw and de-burring.

I also got my flexplate from Amazon. ATP Z-105 Automatic Transmission... https://www.amazon.com/dp/B000C8RDBY?ref=ppx_pop_mob_ap_share

It bolted on and has the correct weight for my 302 external balancer. I used my old stock starter


FLEXPLATE -- Years ago, I recalled the tale of an owner Why is some of this in PURPLE? who had made a conversion to the AOD, and had learned the hard way that the old flexplate did NOT work correctly and, in fact, ruined his engine.  I asked Ron for more specifics, and his answer appears here.  I also found other AOD info that I had posted, and include those links in this box as well.


The C-4 flexplate. Is 152 tooth (smaller).  The AOD is much larger 164 tooth.   You must change them or the converter will not bolt up at all. 

The issue is getting the wrong flexplate.  I had one recommendation and ordered it to find the offset from the flywheel was too short and if I had tried to use it would of been a mess. 

 The one I purchased in Amazon is the correct flexplate for the year of our 302 and our conversion.

This plate is 50 oz offset weight for our older motors.  If someone chooses to change motors they will need to discover the correct combination.

Other AOD info on the Annex:

Gear ratio in the rear end when changing to AOD

Other AOD notes from owners

I needed to make a new transmission mount for the old C-4 would not work. I took some 2 inch angle iron and made two small pieces to bolt to the stock channel iron welded to the frame. I used socket head cap screws with blue die springs to mount the angle to the transmission. See the attached pictures.  Another option would have been to cut off the old mount and re-weld it further back on the frame.  This solution is easier, and likely stronger than moving and welding old steel.  There may be a universal transmission crossbar available, but attaching it to the frame presents the same issues.

I ran new 3/8 inch cooling tubing to the transmission cooler external to the stock radiator. If you drive in cold weather loop it through the stock radiator. I mounted my cooling coil on top of my radiator for all that extra space needed something to catch bugs. I bent the tube with hand benders. Used reverse ferrels on the trans. Had some initial leaks here so don't be scared to tighten them.

CLICK FOR LARGER VIEW

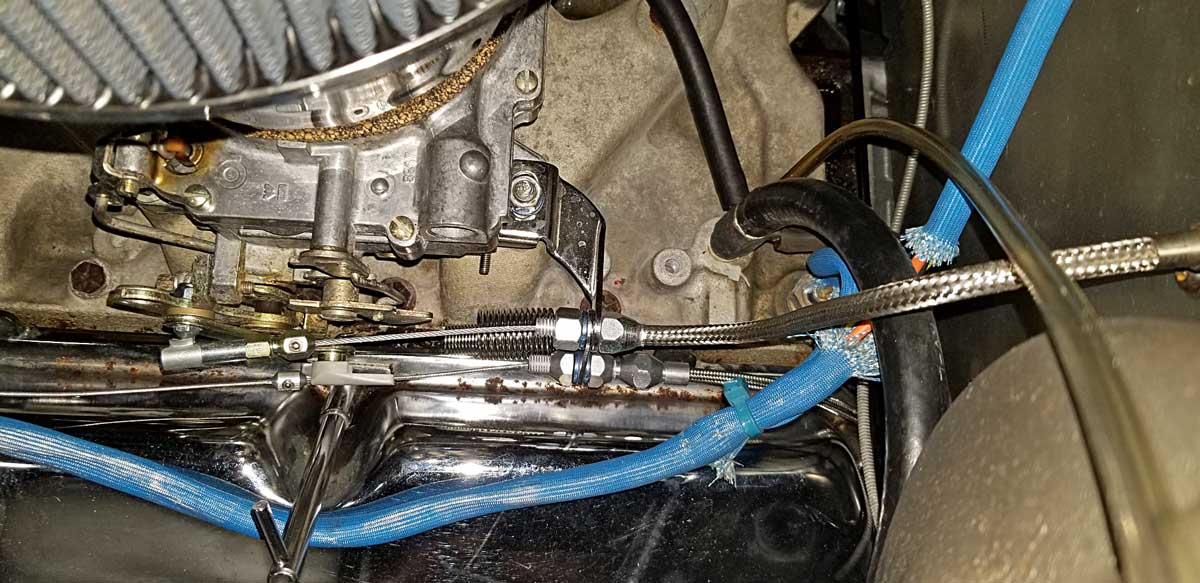
I needed to run the TV cable to my Edelbrock Carb. (I said goodbye to my Holley long ago for blowing power valves). I chose to order a new Lokar TC-1000U 24" Universal. throttle cable .. https://www.amazon.com/dp/B000COMNO0?ref=ppx_pop_mob_ap_share 

CLICK FOR LARGER IMAGE CLICK FOR LARGER VIEW
Side view on left, looking down on carb on the right.

My car already had a Hurst ratchet shifter so I continued to use it.

I purchased the AOD park switch and reverse lights connector. The switch is inside the AOD.
AOD Neutral Safety-B/U Light Connector Pigtail https://www.amazon.com/dp/B00AQ4AN84/ref=cm_sw_r_cp_apap_FFNGQrxjtupGg


Wired to neutral safety and the others to reverse backup lights.

I was given a free Audiovox Cruise (speed) Control. I thought while I was under the car i would install it. It had the magnet pickup for the drive shaft. This worked my old 302 without any ECU or crank sensor.
If you are looking to purchase one. Guess where? Rostra 250-1223 Universal Electronic Cruise Control https://www.amazon.com/dp/B007ZCQD9S/ref=cm_sw_r_cp_apa_i_ph32CbA5ZWCFP


I plan to retire in a couple of years and want to drive it down to the gathering in Florida (if it is still being heled). I am looking into a teardrop camper to go on it.

I like the AOD. It runs 70 mph at 1800 rpm. My 10 gallon tank can take me 130 to 145 miles if I keep my foot out of it. If I choose to get on it it will break loose the tires on every shift.
Having read an older submission to the Annex about rear-end ratios maybe needing changing when changing to an AOD, Ron said that the special-built transmission had taken into account what the rear end ratio was.  The rear end ratio might need tweaking if replacing with a salvage, or stock AOD.


I will show you my disc brake conversion. I used S-10 disc brake cylinders and Jeep rotors. I used a Ford Granada power brakes master cylinder and tilt steering wheel from that junkyard car. I used the complete wiring harness from that car so I have a good wiring diagram. This put the dimmer switch on the turn signal arm.