The measurements above are not for this trunk, but the
|
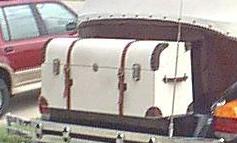
This is more or less the look that I am going for. I will put in a lock set in the center, and may use brass clasps since brass hardware seems more available at Home Depot. The curvy leather trim at top hides a necessary seam in the vinyl. | ||||||||||||||||||||||||||||||||||||||||||||||||||||||||||||||||||||||||||||||||||||||||||||||||||||||||||||||||||||
|
Car 106 - black leather, large, tall, on raised trunk platform Car 129 - black, flat top, looks like a real trunk, good size, with a newer replicar. Car 220 - tan, padded vinyl, not too large front to back, flat top - plain look, proportional Car 318 - black vinyl, flat top, larger, plain, also spare on back. Car 377 - tan, large trunk on a Roadster, covered? - no handles - sits way back Car 380 - black, low, flat top, store bought trunk on a Roadster - good proportions Car 407 - black store-bought rounded top trunk. Looks like it belongs w/ car. Car 419 - brown leather?, quilted, flat top, bought trunk Small, on a Roadster. Car 533 - Tan wicker basket trunk, very small, luggage rack still upright. Car 600 - black, typical car trunk, sticking out on folded down platform Car 689 - a trunk made for the V shaped part of a trailer tongue - tilts (Annexmaster's car) Car 766 - black, brown trim - typical, again sticking out on the platform. Car 899 - black, more squared off, but appears to be a car trunk - silver trim. Car 806 - white vinyl cover over the trunk - smooth look. out on platform. Car 851 - black vinyl, tall, not so deep, silver trim nice proportions - snug to car. Car 885 - black vinyl on a Roadster, larger, padded, softer look. Car 1022 - White, lowest, skinniest trunk seen so far - more like a tool box. Fuzzy pic. Car 1178 - white vinyl on all white car. skinny very tall - sitting out on platform looks odd. Car 1209 - white vinyl brown trim larger on a Roadster. -- I quit with the '74 -75 models - did not look at the Replicars at this time. What I did NOT find, that I thought that I would, were any "trunks" - antique, camel back trunks, which was my idea, and what was used sometimes "back in the day". |
Other trunks -- While I was looking at trunks, in planning my next one in 1/2009, I thought I would list some that were interesting, to save you hunting around for them. | ||||||||||||||||||||||||||||||||||||||||||||||||||||||||||||||||||||||||||||||||||||||||||||||||||||||||||||||||||||
|
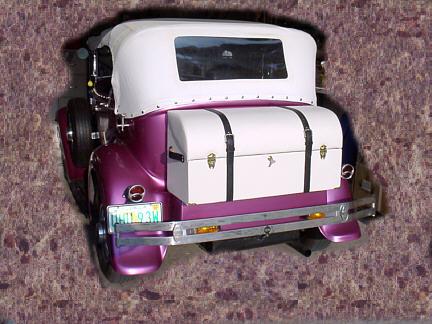
Update in December, 2008: Upon selling car 1254 and buying a California car that needs a trunk, I checked this page and found that I had not even put the full measurements in my original trunk write-up. Note that the 1973 that I bought has a small platform and the folding luggage rack compared to this 1978, and also the 1973 has the gas cap ON the back platform, suggesting that I will design a way to slide the trunk out of the way to gas up. (that being easier than what some have done, which is re-locate the gas filler) -- see results here. After building the trunk, and with several years of use, I suggest that an inch or two shorter up and down would allow the third brake light to go ABOVE the trunk for better visibility and also Make your trunk as BIG as you think looks ok. Folding chairs ended up in the back seat of the car -- I don't know if you can make a trunk large enough for the chairs, but, size does matter, so make your trunk as big as you can. MEASUREMENTS: This finished trunk measures 36" X 14.5" X 17.75" Jumping to completion: This is my finished "clone". The bottom of mine is smaller and the top larger, and overall mine seems taller, which is not particularly a good thing. I thought I had left enough room for a center brake light above the trunk. That did not work. Mine may also be wider than the one pictured above. The weird background is to hide all the junk in my garage! Overall, I am satisfied. I now have a place for my jack, fire extinguisher, jumper cables and windshield cards explaining WHAT this car is The lower picture is from several years later - note the different top, new reproduction bumper and third brake light. |
||||||||||||||||||||||||||||||||||||||||||||||||||||||||||||||||||||||||||||||||||||||||||||||||||||||||||||||||||||
|
|||||||||||||||||||||||||||||||||||||||||||||||||||||||||||||||||||||||||||||||||||||||||||||||||||||||||||||||||||||
 |
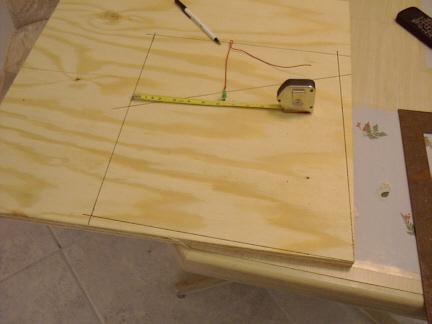
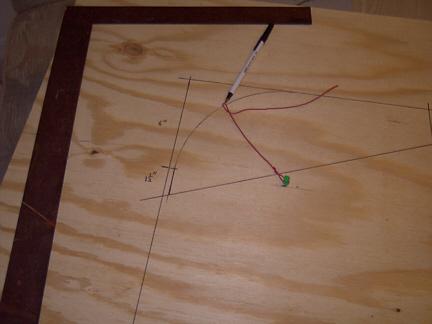
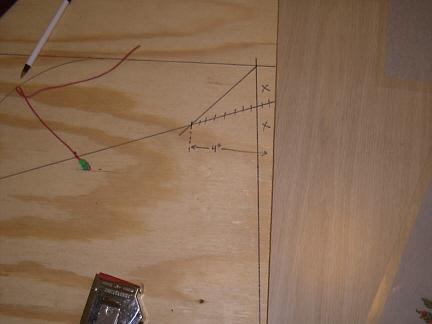
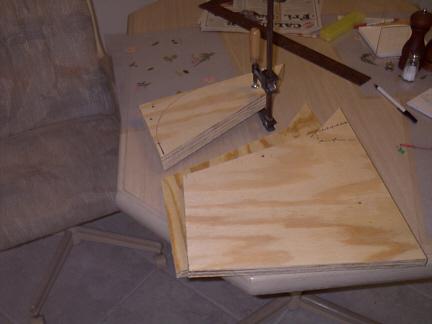
The side panels are the key. In this
picture you see the top of the 3/4 in plywood side, with
the overall rectangle marked off and the little wedge on
the right. marked to account for the slant of the back of
the car. Map pin and wire use to make the curve. It is in 6 1/4 from the left and down 6 in from the top. |
||||||||||||||||||||||||||||||||||||||||||||||||||||||||||||||||||||||||||||||||||||||||||||||||||||||||||||||||||||
| To see pencil sketch used to measure these panels go to TRUNK 2 | |||||||||||||||||||||||||||||||||||||||||||||||||||||||||||||||||||||||||||||||||||||||||||||||||||||||||||||||||||||
 |
the whole board with the wire ready to scribe the curved part. Note the wedges of waste material at bottom and right -- these account for the fact that the back of the car is not 90 degrees. | ||||||||||||||||||||||||||||||||||||||||||||||||||||||||||||||||||||||||||||||||||||||||||||||||||||||||||||||||||||
 |
circle is scribed. the top is smaller by 1/4 inch to account for the "skin" which goes over the curve. I ended up using a 1/8 inch hardboard (pegboard without the holes) so I hope it lines up. I planned (after I saw the way the skin curved) to add a bit of foam padding on the curvy part. | ||||||||||||||||||||||||||||||||||||||||||||||||||||||||||||||||||||||||||||||||||||||||||||||||||||||||||||||||||||
 |
As per the plans, the lines are in place for the back
of the lid. The lid goes to a point, more or less so that
it won't swing back into the back of the car when the lid
is raised. Even at best, it looks like the lid will go BEHIND the back of the trunk an inch or so when it is up. More picture of THAT later. |
||||||||||||||||||||||||||||||||||||||||||||||||||||||||||||||||||||||||||||||||||||||||||||||||||||||||||||||||||||
 |
I tacked the two rectangular sides together with nails stuck in the parts that were scrap and cut them both out at the same time. I used a circular saw to cut the top from the bottom half and finished the cut where they met with a little hand saw. The curve was cut with a reciprocal saw and smoothed by sanding. | ||||||||||||||||||||||||||||||||||||||||||||||||||||||||||||||||||||||||||||||||||||||||||||||||||||||||||||||||||||
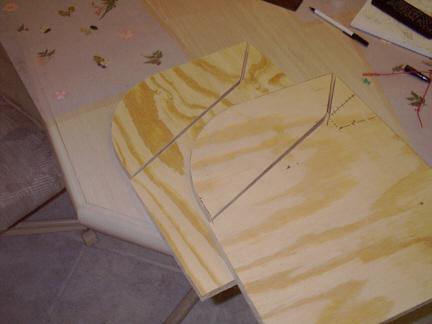 |
Here are both pieces after cutting. | ||||||||||||||||||||||||||||||||||||||||||||||||||||||||||||||||||||||||||||||||||||||||||||||||||||||||||||||||||||
 |
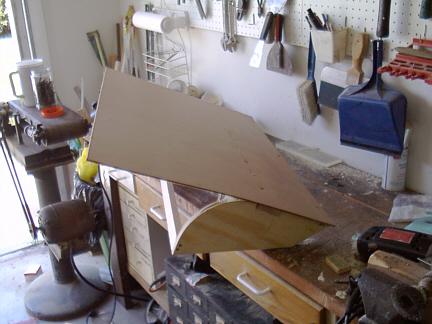
1/4 inch plywood did NOT work very well. After cutting many grooves in back, it just didn't bend nicely, and started cracking along the bend. I decided to try 1/8 inch hardboard instead. This piece of plywood was trashed. (it MAY have worked better if I had looked for a piece with the outer grain going long-wise. | ||||||||||||||||||||||||||||||||||||||||||||||||||||||||||||||||||||||||||||||||||||||||||||||||||||||||||||||||||||
 |
I added a brace across the top of the lid, just
before the curve began. I notched it into the side panels
and used construction adhesive (liquid nails) and long
drywall screws. St the far left of the pic. the 1x2 brace DOES stick out beyond the point of the side. It will sit INSIDE the base. Look 4 pics down at the base. |
||||||||||||||||||||||||||||||||||||||||||||||||||||||||||||||||||||||||||||||||||||||||||||||||||||||||||||||||||||
 |
3/4 inch screws were put on the back edge and in the middle of my new brace (glue also) and then came the bending part | ||||||||||||||||||||||||||||||||||||||||||||||||||||||||||||||||||||||||||||||||||||||||||||||||||||||||||||||||||||
 |
Screws every 4 inches or so, countersunk so they didn't stick out. | ||||||||||||||||||||||||||||||||||||||||||||||||||||||||||||||||||||||||||||||||||||||||||||||||||||||||||||||||||||
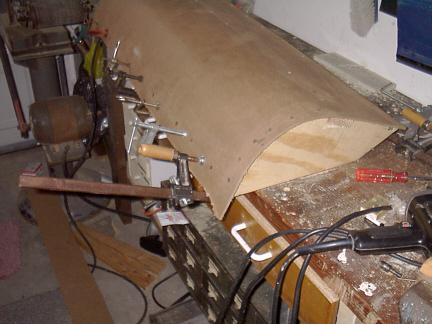 |
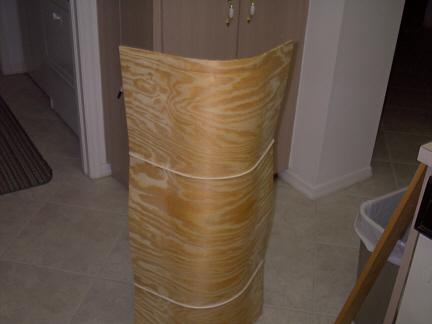
With a helper to push and bend, I used long drywall
screws along the curved sides, and short 3/4 in. flathead
screws all along the 1-by edges Glue everywhere. These screws did NOT countersink as well as I had hoped. So I now see the need for 1/4 inch foam padding on the lid before applying the vinyl or convertible top fabric. |
||||||||||||||||||||||||||||||||||||||||||||||||||||||||||||||||||||||||||||||||||||||||||||||||||||||||||||||||||||
 |
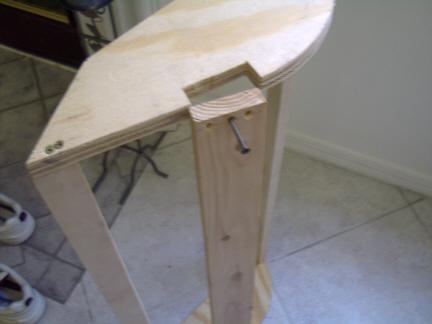
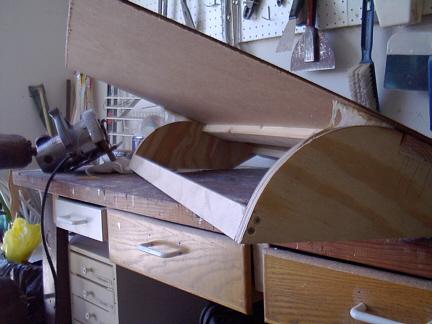
Here is a view of the box assembled. The little point on the right does stick up 3/4 of an inch beyond the back. The 1x2 on the top does not go out to the edge. We will see if that fits together right. | ||||||||||||||||||||||||||||||||||||||||||||||||||||||||||||||||||||||||||||||||||||||||||||||||||||||||||||||||||||
 |
PROBLEMS - at this point I am
observing some problems. The hardboard did NOT bend as
nicely as I would have liked. There is tempered and not
tempered hardboard. I think tempered has some kind of oil
in it, not good for painting the inside - but would
tempered make it bend better? Also, convertible top guy
said I should have wetted the hardboard before bending it.
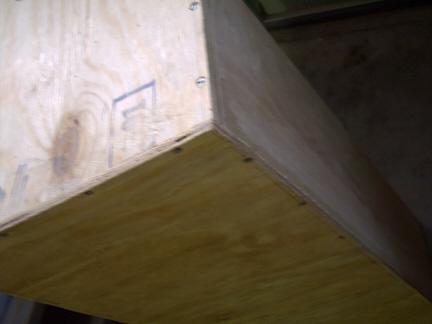
Don't over-do that though. SIZE - I wanted big, but it may be too high for a planned third brake light to work. I don't want to cut it down at this stage - but may have to. My base of 3/8 (on sale) plywood may be a bit thin. Plan calls for 1/2 inch -- better. A fuzzy picture of the bottom corner. |
||||||||||||||||||||||||||||||||||||||||||||||||||||||||||||||||||||||||||||||||||||||||||||||||||||||||||||||||||||
| Phew -- This page is getting so large that it may NEVER load. Continue, if you wish to TRUNK 2 -- the rest of the project. | |||||||||||||||||||||||||||||||||||||||||||||||||||||||||||||||||||||||||||||||||||||||||||||||||||||||||||||||||||||
