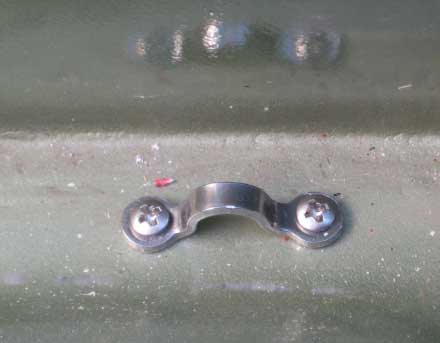
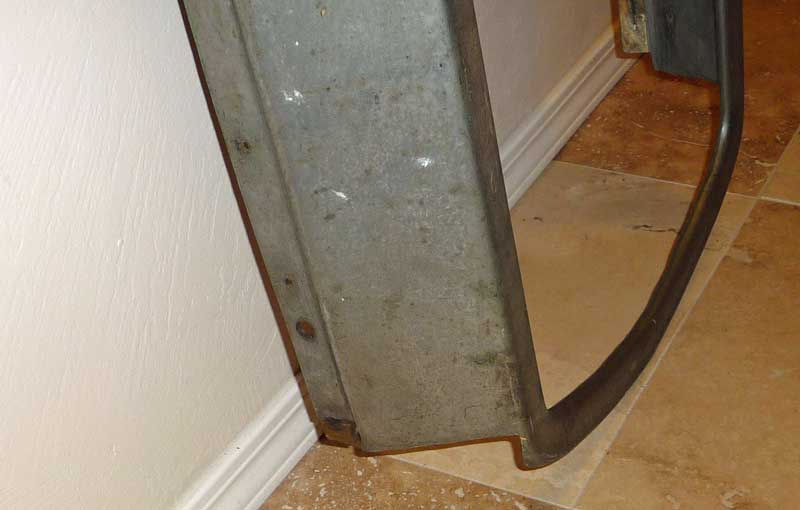
Door hinges loose
44-06 Door hinge pins loose. Door fit sloppy, doors sag.
This problem has come up a few times over the
years - without a good solution being reported.
In 2018 the following info was posted on the message board by Tom Downs,
Glassic Roadster # 1069 (a 1974)
Trying to align my doors and the hinge pins are loose and the doors are
a sloppy fit. Has anyone found oversized pins? Does anyone have a
solution?
After no response here
(on the message board)
I started my internet search and finally was able to find a solution.
It appears the door hinges on my roadster #1069 are early Bronco,
1966-77. My hinges were .290 on the ID and pins were .277 OD. This
made my doors really loose and impossible to align to the body.
I found oversize hinge pins .312 diameter that are for a 1932-48 Ford.
Part number 173248-709 from Custom Classics and Rods in Elk River, MN.
and purchased a 5/16 reamer (.312) from Amazon.
I also found an early bronco door hinge shim kit at Tom's Bronco Parts
part number 1120K http://www.tomsbroncoparts.com
To resize your hinges to accept the .312 pins you must remove the
hinges from the body and the doors. With the old pins in place hold
both the door and door post halves of the hinge as a set in a vise and
then
remove the pin. Clamp the hinges at the fat-round edge so the halves
will not move when the pin comes out. Do not clamp them further down
on the flat part of the hinges. First drill
with a 19/64 (.296) drill, then ream with the 5/16 reamer, or with a
5/16" drill if you opt to go that way instead of reaming. You should
now be able to align your doors using either existing shims or the new
ones listed above.
Top pins
46-03 Top pins
These are the pins that hold the top to the stanchions of the
windshield posts. They hold the top in the up position.
If a replacement
can't be found, you can tap the holes and put in
thumb screws as an alternative. Has anyone found
these?
Aug, 2008 Michael responded:
I found replacement pins at West Marine (Lincoln Park if you
near Chicago). I imagine other boating supply stores
would also carry them and would be a good place to search.
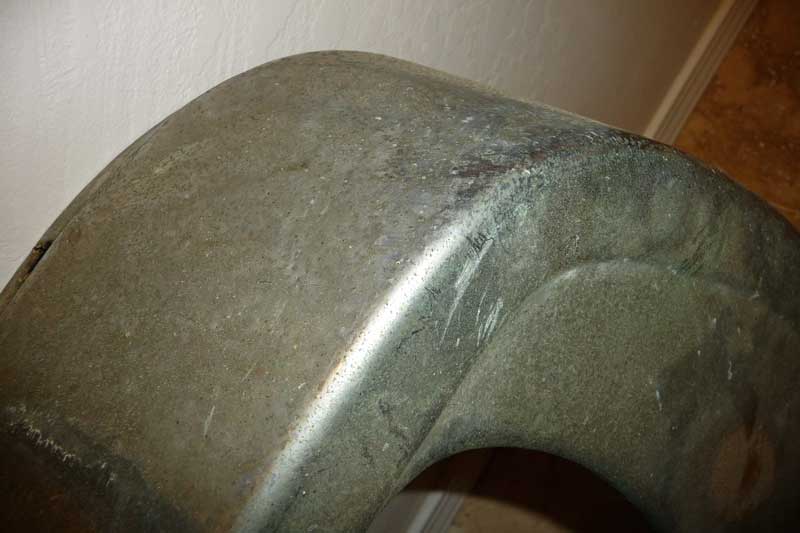
Securing the top to the windshield
In Feb. 2009, John, car 1254 wrote:
Anyway
the reason I am witting you is that the last time we met you mentioned
that you never trusted the top and were always afraid it might blow off
at high speed. Well you scared me and I went to work. I will attach
pictures of what I did to cure the problem so you may want to include
them in your next top project. I used flat aluminum stock from Ace
hardware and just bent in a vice and drilled and -- boom they
where installed and are hardly noticeable.
Annexmaster note: I didn't recall mentioning that fear - I had
been referring to the connectors that I had made for the back of the
fiberglass top that I had built --
But,
since he mentioned it, the FRONT of all Glassic tops is secured only by
those two little pokey rods (one of which had broken off of car 1254
before I owned it, and had to be repaired) so his solution to strengthen
that font windshield post security is well based - whether on a
fiberglass top replacement, or the original soft top.
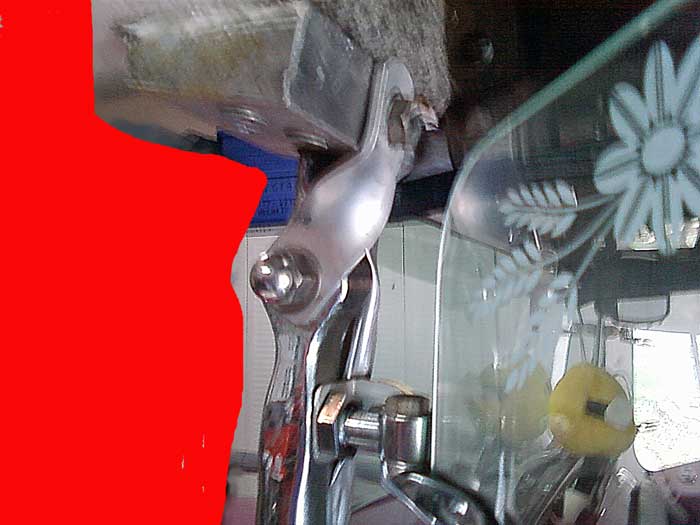

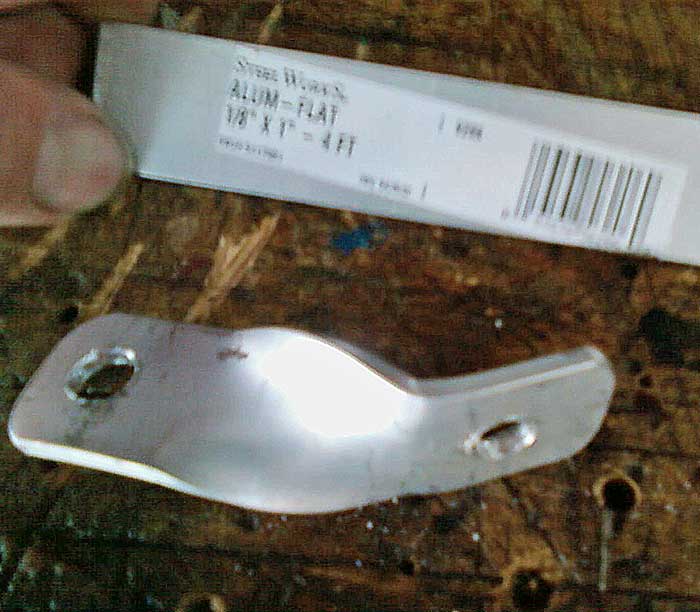
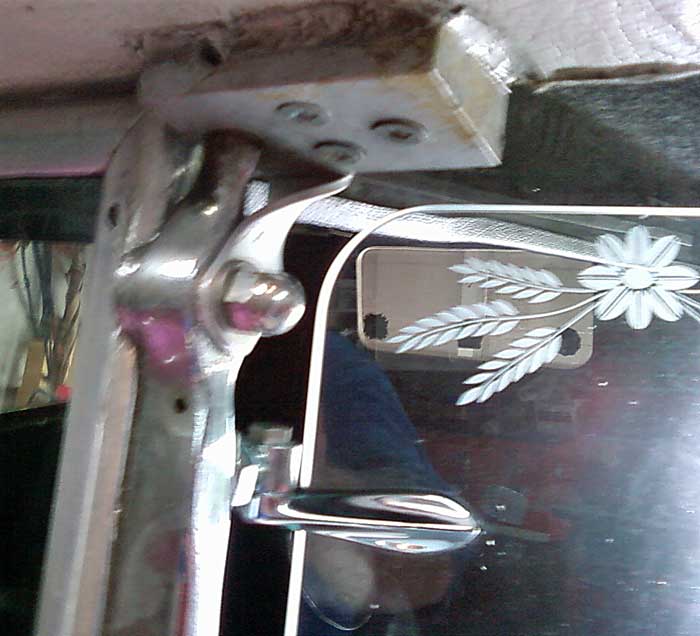
Sorry about the focus on these -- this
bracket adds a secondary connector from the windshield stanchion to
the block holding the top on. It uses existing holes and hardware. The
aluminum is 1/8" x 1" bar stock.
|
Where the original top frames came
from:
In late 2009, in response to a question by an owner,
Joel provided the following info:
The top
frames were built by a little two man outfit which is out of business
and both men have since passed on...
The owner
was hoping to find the original plans for the top frames. The top frames
of Glassics were designed especially for Glassics and hired out to be
custom built. Model A top frames don't fit Glassics. |
Cleaning materials, metal polishes
restoration suggestions
Whitewall cleaner, plastic window cleaner etc.
Car 1254, The new owner, John shared the following WHEEL CLEANER
in Dec. 2008:
If
you ever need to clean up old metal wheels, I found that using a
product called Mothers Powerball Medal Polish System is the
best. It is a cloth ball that goes into a power drill and polishes as
it cleans.
Car # 341 in July, 2008 shared the following metal polish:
Those gauges
(Old International Scout gauge cluster from a junkyard)
cleaned up fantastic. they look new other than the fact that we had to
pry them open to clean 40 yrs of crud off the inside of the glass. Not
fun. If someone needs metal polishing stuff I strongly recommend
Eagle One Nevr-dull Wadding Polish. It took off rust and shined it
up great. I found my can sitting in my dad's garage and gave it a shot.
I think it's available at Fleet Farm. I'm impressed with how it turned
out.
Car 1254, the Annexmaster discovered the following whitewall
tire cleaner in 2007.
A guy saw my car on the street and said he cleaned cars for a dealer.
He recommended Bleche-White as a whitewall cleaner. He said it
could be found in most stores and comes in a flat plastic bottle like
liquid Turtle Wax comes in. I think I got it in Walmart, or a grocery
store. It is a white bottle, kind of old fashioned looking in the label
style.
This stuff is STRONG and you should read all the cautions. It eat the
grime right off the whitewalls on my car - and no rubbing was necessary.
Worked great, but be careful, the stuff is like acid.
Car # 885 in Oct., 2008 shared the following tip for
cleaning plastic windows:
I read on the message board some questions about cleaning the top and
windows without scratching. I have a new top and interior on my
roadster #885 and was advised by my upholsterer to use Lemon Pledge
to my amazement it works great.
|
| Group 41 Seats
41-14 Rear seats
Info supplied in 3/2008 by Joel, the builder of the cars.
REMOVING THE REAR SEAT BACK
The back Phaeton seat had two 1/4 - 20 studs welded on that stuck
through holes in the back of the tub...Take the nuts off and the seat
removes toward the front of the car...
|
|
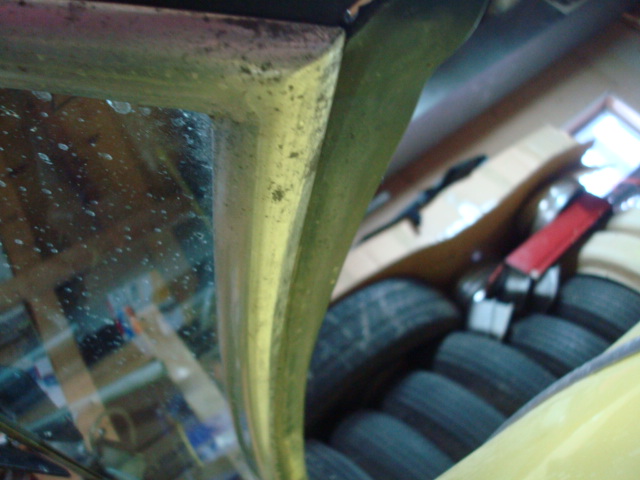
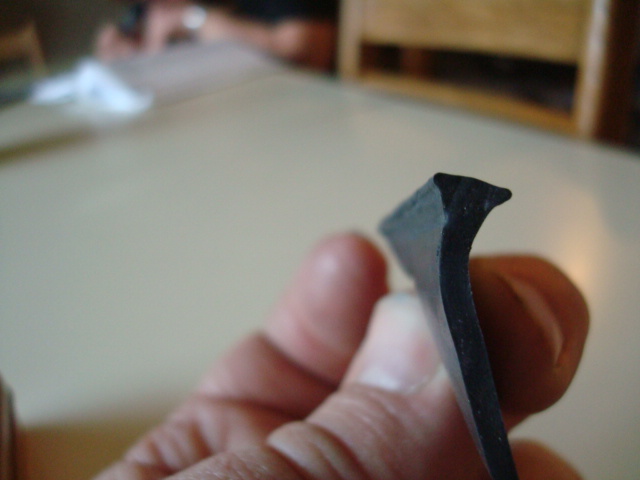
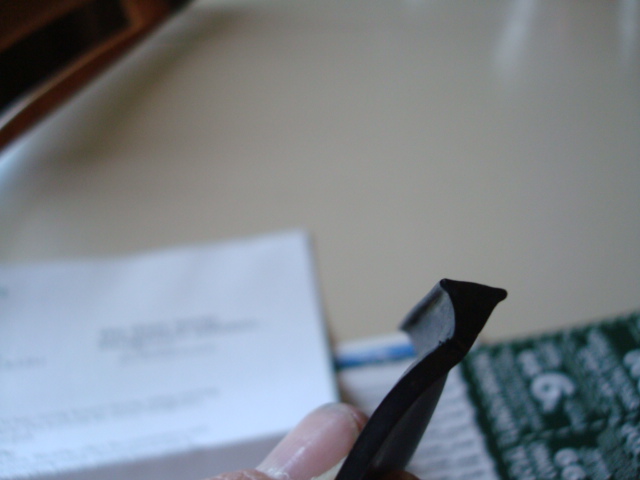
Rubber trim around windshield
In January, 2012, I got a copy of an answer to another owner's
question on the Message Board. First, thanks to Chuck for copying me so
I could post these pics, and second, here is his info:
Here are some pics hope this helps.
The first pic shows how the strip kind of overlaps the body. The second
pic shows the strip with the windshield pushed forward. The strip is
slid through the middle of the frame. The next ... pics show what the
strip looks like from the end view. I will try to locate the bill for
the strip so I can tell you where I bought it.
Annexmaster note: As far as I know, this trim fits all years of Glassics
and is available from Model A catalog places. The LINKS page on the
Annex has some of them. When working on my 1978 years ago, I
remember that I could only find it in black and it was very hard to
slide in. I think I ended up greasing (or vaseline) the trim so it would
slide - and still had to tug with pliers.
Also,
installing it stretches it, so you should let it sit for quite a while
before trimming it, since it will shrink back.
 |
|
Group 44 - Doors, hood, trunk and tailgate
Hood hold-down latches and
straps
(scroll down for an item on removing the hood
latches
for a cleaner look)
In Feb. 2009, Dennis, car 189 shared the following: (pictures below)
I installed these so
I could put the hood on and run straps from the hood to the hold
downs. They are SS (stainless steel)
with all SS hardware. I paid under $15 for the entire setup and
purchased from Boaters World. If anyone is interested Ill send the
part number of the hold downs. The current straps are just to get an
idea of what it will look like after Im finished. The ones Ill get
(or make) will be a buckle type so no chance of slipping.
Boat superstores
appear to the Annexmaster to be a great place to shop for ideas for
Glassics. Their wide array of weatherproof plastic, stainless and
aluminum products are great. Find a large boating supply store in your
yellow pages and see what they have. If you know your prices for
stainless, nuts, bolts, fittings, screws, etc. you may well find them
cheaper than the hardware Home stores.
Dennis, and many
others like to run their cars without the side panels in place, but with
the hood on. I also saw some hot rod spring loaded things like barrel
bolts that were made for hot rod hoods and fit up under the hood, and
sent a bolt like rod into the front radiator shell area and into the
cowl. The bolts are horizontal.
I never did find
those in a hot rod catalog, but something made me think they were very
expensive.

Boat supply stores have all kinds of
stainless goodies that may be of interest to Glassic owners.
Removing the hood latches for cleaner lines
October, 2010, Steve, car 699 reported:
Heres how I attached the hood without using the old hood latches. I
hope this will help someone if they want a different look. Without a
great expense, I think the total cost was less than $15.00 dollars and
it looks good.
1. Removed all
old chrome latches and bolts from hood
2. Filled all
holes using
¼ black nylon hole plugs from
hardware section at Lowes.
Used on furniture & Cabinets (come 4-to a pack)
3. Drilled (4)
¼ holes (1) on each corner of the hood with the hood mounted on the
car in place
Note: Drill all way thru the body in back where the hood meets the
cowl and all way thru the radiator frame in the front. Note: I added a
extra steel bracket to radiator frame one on each side inside the
radiator frame for added strength and drilled ¼ hole thru bracket for
the Nylon Rivet to go thru when you pushed the Nylon Rivet thru
(Hood-Radiator Frame-Drilled Bracket)
4. Used
1/4
Nylon Rivets 2 long Part # 961-065 Dorman part from Auto Zone
5. Installed
Nylon Rivets in ¼ pre-drilled holes & Tighten all Nylon Rivets to
secure
the hood to the car
6. Reverse
procedure to remove hood takes less than 5/minutes. to remove hood.
7. Have tested
car at 70 MPH on interstate with no problems with hood coming loose
what so ever. Note: I carry extra Nylon Rivets in my tool box in case
one would break.
See pics of car 699 for Hood.
|
| Group 45 Interior trim
45-55 Interior Accessories
Owners manual. No owners manual or instruction booklet was
ever produced for either the Glassics or Replicars. Some cars may have
come with some Ford booklets for some of the components in the cars. |
|
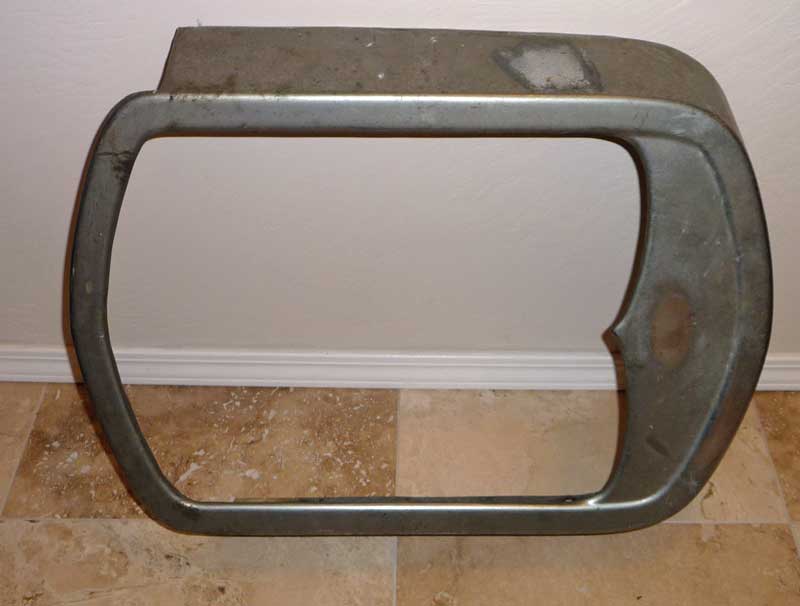
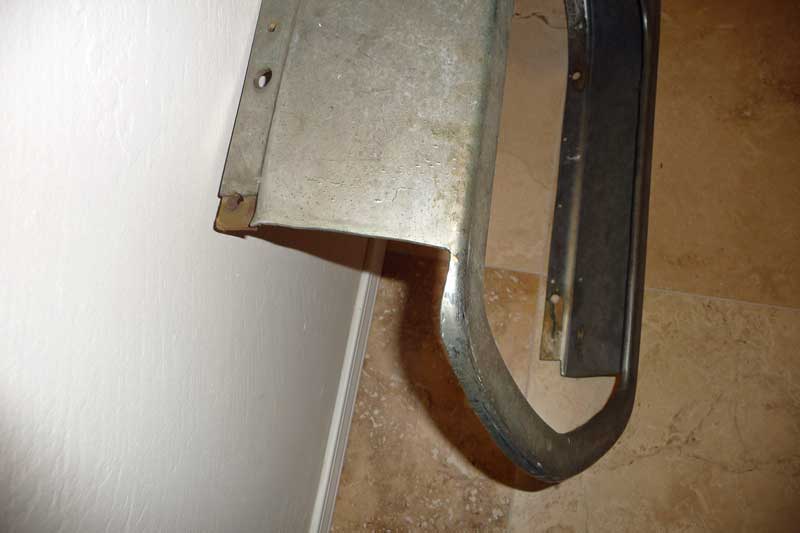
Reference pics for a grill shell -
Replicars era
Earlier Glassic shells are similar in appearance and shape.
Some reference photos with measurements. These shells were plastic
and subject to warping and bending. These pictures were added in 2012
from the Annexmaster's parts bin. The holes in the top (not seen
in these pics) show where the hinge rod was bolted on. The older
Glassics had a single piece hood, while the Replicars had the split
hood.
Total overall height 27 inches. Measured with the shell upright on
the floor, and a mark on the wall at the highest spot.
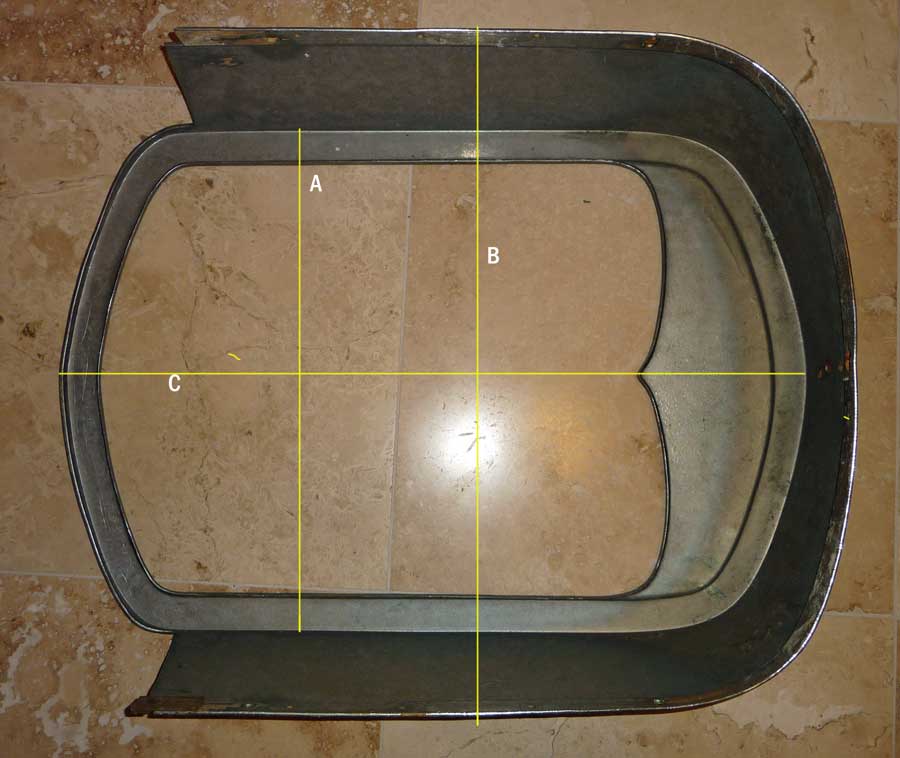
Line A measures 18 inches-- not the opening, but the opening
and the lip on each side Line B is 21 inches -- the overall width
Line C is 26 3/4 inches. The shell opining itself (the part
of the mesh you would see) is 15 3/8 to 15 1/2 inches across and ABOUT
19 to 19 1/2 inches high depending on where you measure Along line
C, in the middle, the opeining itself is 19 inches.
The cut across notch is 4 inches deep where you would see the shell with
the hood sides on, and another inch where it is indented to be covered
by the hood sides. The very bottom of the front lower curve
drops to about 4 3/8 inches below the flat cuts on each side.
Plastic, chrome plated -- not immune from pitting and corrosion. This
shell looks like old galvanized steel and its smoothness can't be
restored that I know of.
|
|
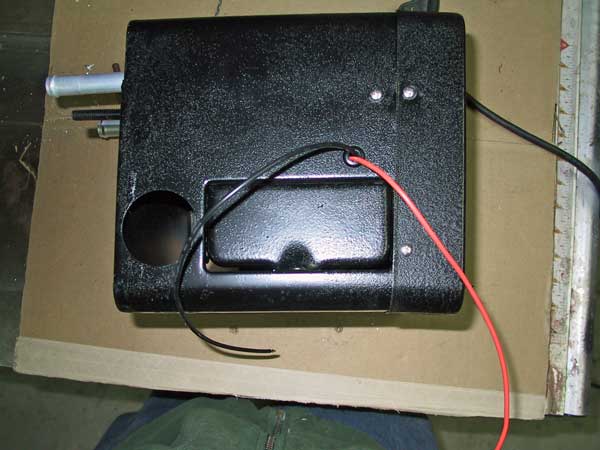
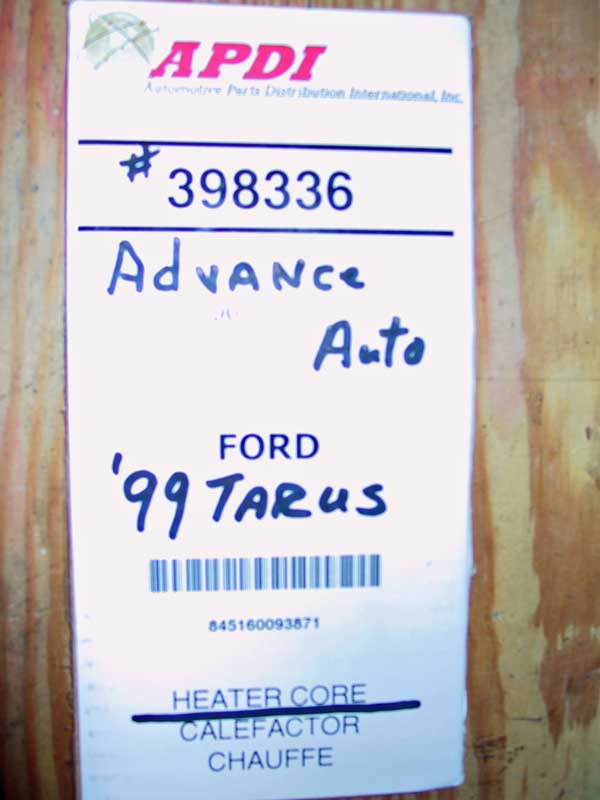
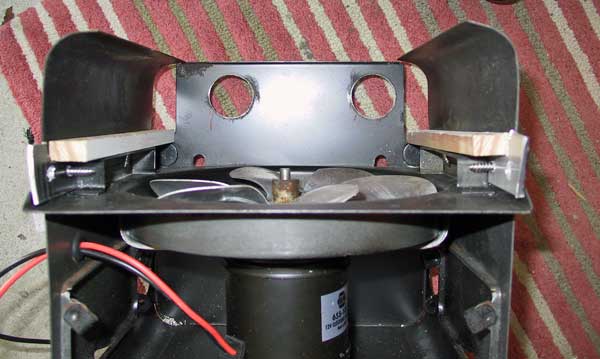
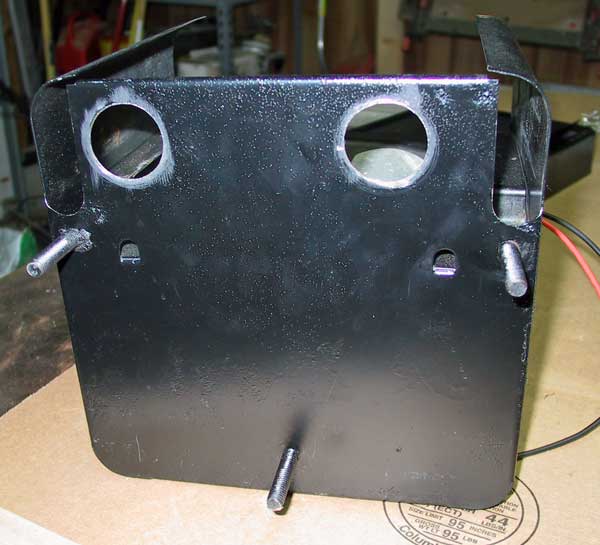
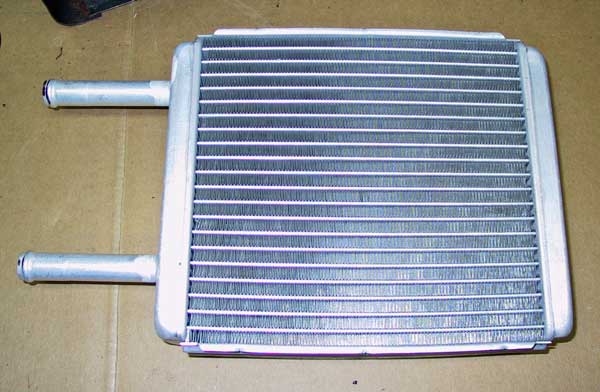
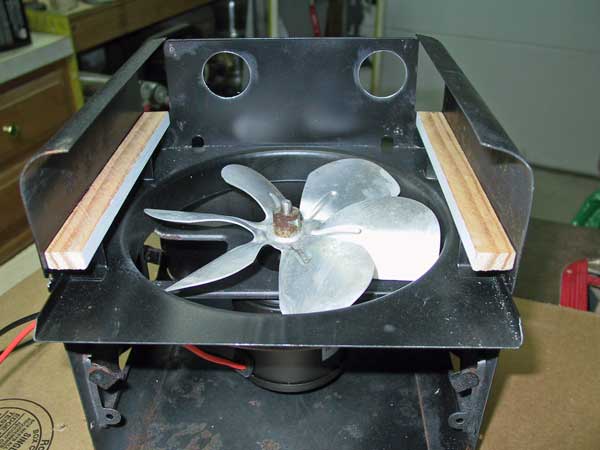
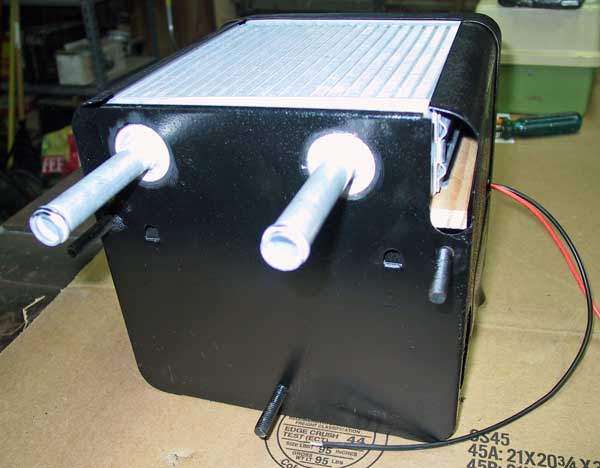
Replacing the heater core with
a newer part
in Dec. 2012, the owner of car 1500 sent the info below.
This may also work on earlier Glassics, but you should check
measurements first.
Due to the cost of repairing or re-coring my original leaking heater
core I looked for a replacement. I was not able to find an exact
replacement, but was able to find a core very close to the original from
Advance auto part # 338336 for a 1999 Ford Tarsus.
specs
H 7 1/8"
w 7 3/4"
2" thick
This core is a very close fit, but is 1/2" thinner than the original and
about 1/4" too long to use fully attach the front cover at the top of
the heater box (see attachment heater side view). I was able to use the
bottom screw holes on each side, but had to add a tab of metal about
3/4"X 1 1/2" on each side to let the top of the front cover move out
about 1/4" to compensate for the longer core. In the pics the the 1/2"
shims can be seen to compensate for the thinner new core. Also two holes
need to be cut in the back of the heater box for the water tubes.
The core fits tightly in the box and I am very happy to find a good fit,

|
|
Horn selection switch car 689 (a
1973 Phaeton)
Posted in 2013. Years ago, when talking with
Joel, he said that, at some point, he
was required to put in TWO horns, since one or more state laws did
not consider an aoogah horn as a real horn, so the cars needed a
"beep" horn. My car has an aoogah horn, but I found a switch
under the dash that I believe is original to the car, and here is
what I learned.
Does YOUR car have this switch? If so, where is
the alternate horn. Include your VIN when you let me know.
GlassicAnnex@aol.com
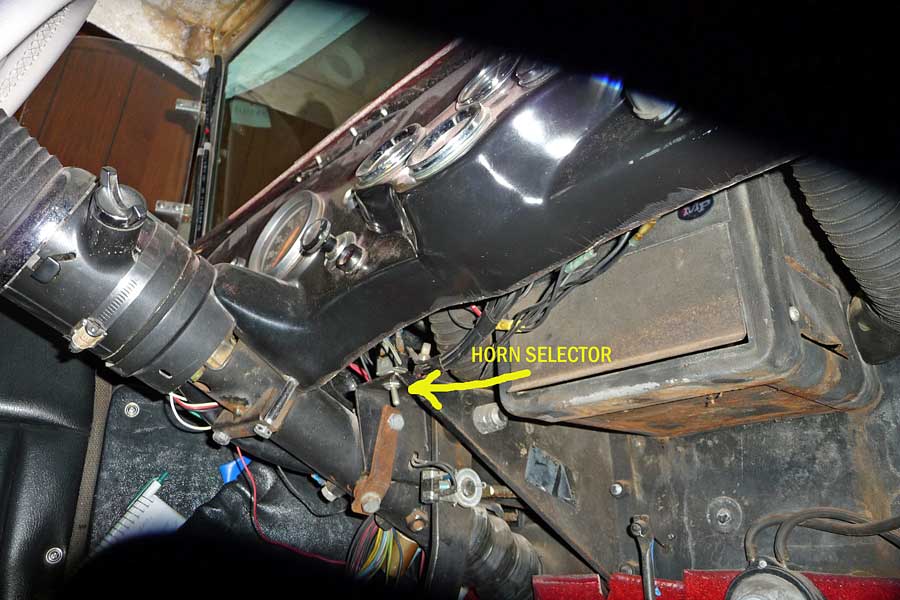
This switch is an A-B type switch. The power goes
up the steering column to the horn button, then back down and into
the center terminal on this switch.
Flip the switch to the right, and the power (with
the steering wheel horn button pushed) goes in the center terminal
and out the left terminal and to the horn
flip the switch left and the power goes in the center and out the
right terminal.
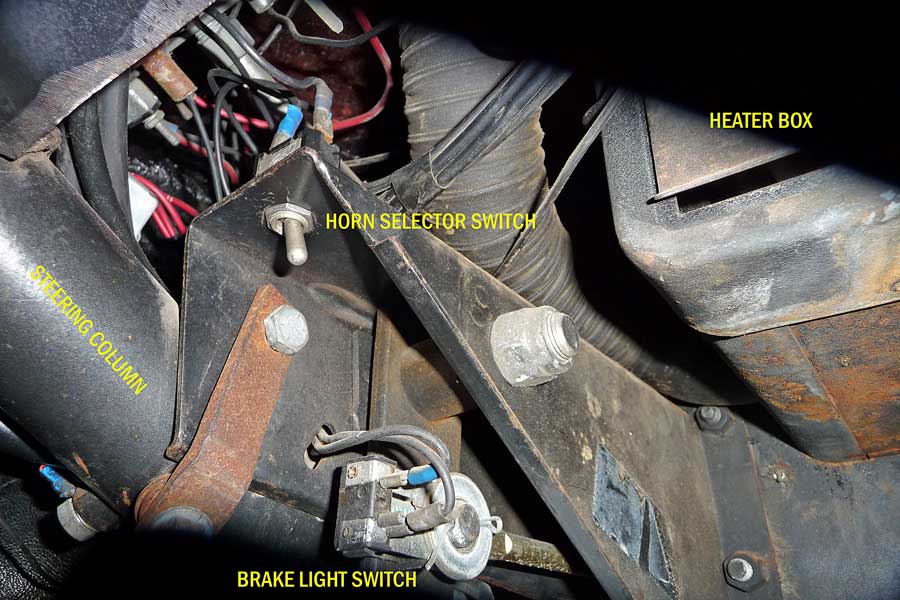
One way powers the aoogah horn and the other is
for the alternate horn.
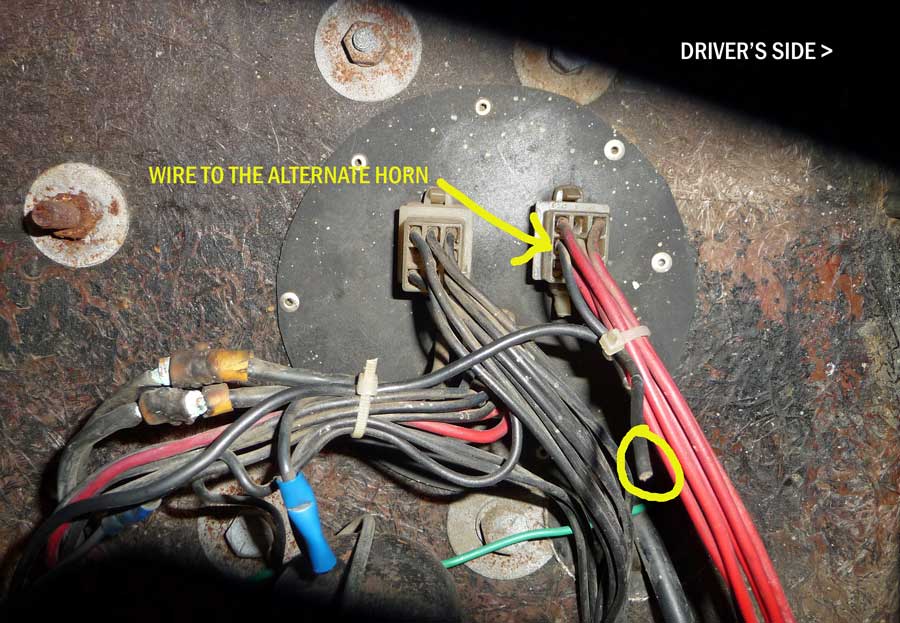
Looking at the firewall, you can see that the
marked connection is for the alternate horn, which in my car appears
to be gone. The wire has
been clipped off, and I don't know where the other end is, nor do I
see the "other" horn. I did not test for the wire that goes to the
aoogah
horn.
2013 - the owner of Roadster # 881 reported having
the switch under his dash and that the "other" horn was a two-horn
setup
located in the front-center on top of the engine, attached to the
intake manifold - located right behind the distributor.
Speaking of horns, I have noticed that several
aoogah horns of mine (car 1254, 689, and a yard sale horn, and a
longer unknown chrome trumpet I got at
a car flea market) -- all these parts seem interchangeable and seem
to fit with Model A reproduction parts. Gaskets, trumpets, and the
noise plate
and adjusting screw seem to be interchangeable and fit one another.
|
|
Cruise control reported on a few
cars.
By 2018, only a few cars have been reported to the Annex to have
cruise control. One car that was sold was said to have had
hand controls installed,. That was Replicar #1263 The seller also
said that #1263 had a 6 cyl engine - very likely NOT original to the
car.
Also Car 899, a 1973, as well as # 1160, a 1978 Replicar and #1402 a
1979 Replicar.
It is unknown if any of these were original to the car when it was
built or were added later on. Regardless, the
technology back then was newer, so use that feature with great caution. |