| Received
3/2008 from Don: Car 162 I was doing some maintenance on my car (#162) this week end and I had to remove the hood side panels. I have done this before and it was a real pain reaching the nuts on the back side of the cowl. This time I went to my local hardware store and bought some Jack nuts. These are expansion nuts much like the ones used in sheet rock . with these installed it is now a five minute job to remove the hood sides as the nuts are now captive behind the fiberglass. Great idea, Don, and much less complicated to do than my solution below. |
|
| Car 1254 -- Here is my project to make it take less than a day to get the hood and sides off of my '78. The split hood is nice, but getting at the engine called for removing all the bolts on both sides of the hood. Putting them all back was even more of a task. My project requires some finishing, and testing at highway speeds, but seems to be an effective solution. Follow-up several years later: 2000+ miles at "around" 70 mph and no problems. |
|
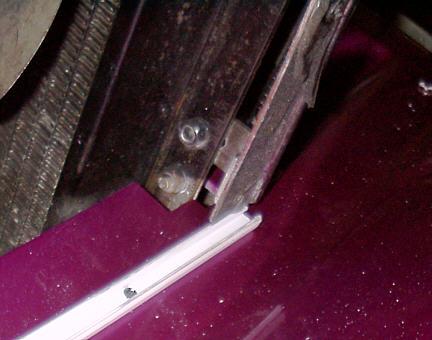 |
I went to the local aluminum products store looking for aluminum U channel. They sent me to their recycle heap where I found this VINYL channel. $1 for a 6' piece that came from who knows what. Flathead 3/4" bolts thru the vinyl and fiberglass, with washers and lock washers below. I used 4 on each side. Those are fiberglass drill flecks on the body. You are looking at the radiator end, passenger side. |
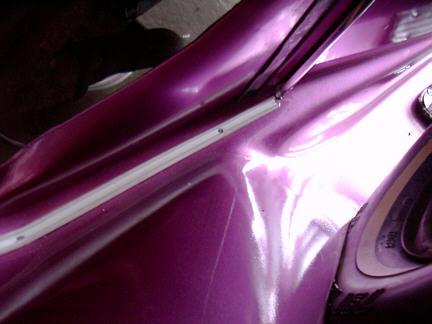 |
This view is from the front, driver's
side, looking toward the back end of the hood. See the
tire in the fender on the lower right? Channel did NOT want to bend, so my wife held it down while I drilled thru the fender (after checking for clearance below) |
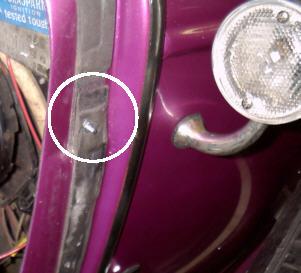 |
The prior owner had chrome trim around the bottom and sides of the hood. It looked like the stuff you put on the edge of your car door. It looked good, and helps fill up the groove. I reversed the bolt of the top hood location, and held it on the car with washers and a nut. Same thing in the top hole of the radiator end of the hood. |
| So now the hood side rests in the U
channel along the fender along the bottom and is held
down in the groove by the bolts at the top front and top
rear of the side pieces. To finish up: I think that 3/4" bolts will do for the top bolts (in the circle above) and I will replace them with chrome or Stainless Steel. Fortunately, the holes in the hood still line up with the the new protruding bolt. My PLAN is to use short flathead bolds on the hood, with acorn nuts on the OUTSIDE -- to fill up the unused holes, and then use acorn nuts on the real bolts on the top so they all look the same. Also, The top bolts on the grill end are just hooked on to the plastic grill shell. I plan to reinforce that by taking some 1 1/2 inch L shaped channel (I got 1" aluminum, but it was too thin) and extending the bracket that holds the radiator, so that it also will make a backdrop for the hood bolt. See the picture below: |
|
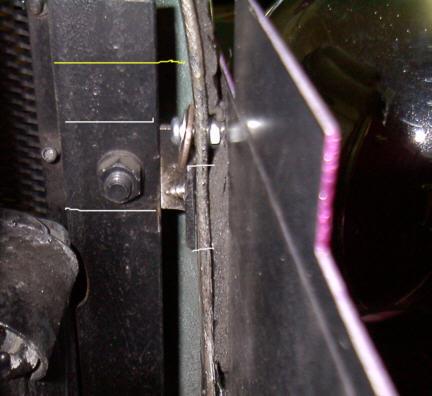 |
Looking at the radiator end inside the hood. The white lines above and below the big bolt are the existing bracket. The yellow line is where the top of the new bracket will be. (about twice as tall) The short white lines are where the old bracket has made the L to hold on the grill shell.(with that sharp screw) Notice how the washer is caught behind the old bracket. The new one will be big enough to back up the entire washer. |
| In reviewing this story in 2008, I don't find it as
clear as I would like. It has worked GREAT, and here is a summary of
what I did. I changed the hood side panels so that they are only held on by one acorn nut at the top front and one at the top rear of the hood side panel. The bottom is held in place by a U shaped channel that the bottom of the side panel rests in. All holes, except the top ones, are filled in with very short flathead bolts from behind the hood panel and an acorn nut on the outside. They are fakes just to fill up the hole. The top bolt sticks out from inside the cowl, and is held in place by a nut. -- it stays there at all times. I carry a small wrench on my keychain so I can remove the acorn nuts anytime I want to. If this is still not clear enough, please email me GlassicAnnex@aol.com since this is a very worthwhile project. |
|